
At True Digitizing, we transform your creative spark into flawless, high-quality embroidery digitized designs that bring your vision to life.
Our Blogs
We Accept
Copyright 2025 Truedigitizing
At True Digitizing, we transform your creative spark into flawless, high-quality embroidery digitized designs that bring your vision to life.
We Accept
Copyright 2025 Truedigitizing

Sleeve embroidery is a little bit different and difficult. You hoop the garment, start the machine and then problems start, because sleeves area is so small and compact, for this raeson sleeves move, curves, stitches pull, hoop alignment out and other stitching issues. Sometimes the fabric puckers so badly that the whole piece looks wasted.
If you face these issues, you aren't alone. Sleeve embroidery needs a different approach. With the right setup, right stabilizer, proper placement, and smart stitching methods, you can embroider sleeves cleanly and confidently.
This blog post explains how to do machine embroidery on sleeves like a pro step by step, using proven techniques that definitely work on garments.
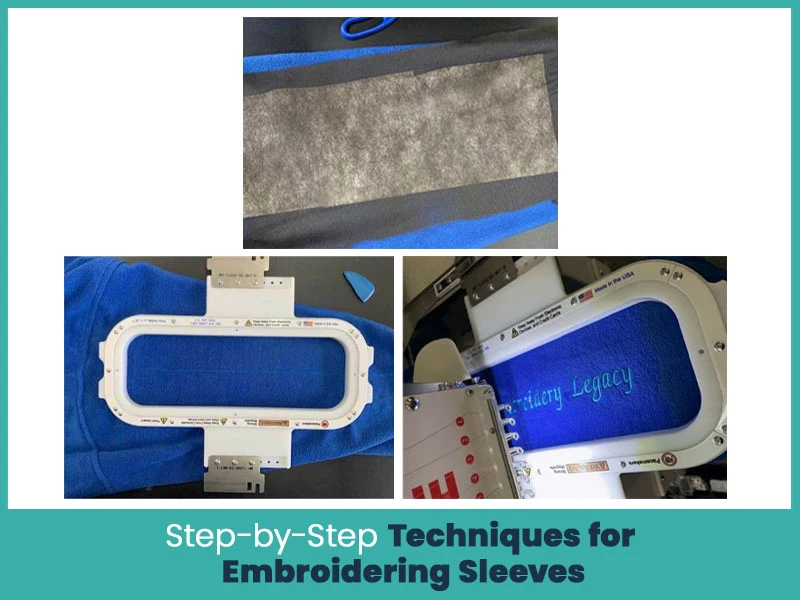
Before advanced methods, the basics must be solid. Sleeve embroidery success starts with preparation.
Sleeves are narrow and curved. Standard hooping methods usually fail here. You need tools that give control without stretching the fabric.
- A machine with a tubular arm helps, but it is not required
- Narrow or sleeve-specific hoops reduce fabric movement.
- Good lighting helps with placement accuracy.
- Slow machine speed gives cleaner results on curves.
Test your design on a scrap piece of fabric before starting stitches.
Stabilizer choice controls stitch quality more than any other factor.
- Cutaway stabilizer works best for most sleeves.
- No-show poly mesh is ideal for lightweight fabrics.
- Fusible backing adds strength for thin or stretchy sleeves.
- Water-soluble topper improves stitch clarity on textured fabric.
Never skip stabilizer on sleeves. Floating fabric without support leads to puckering.
Accurate placement separates clean work from amateur results.
- Water-soluble pens for temporary marks.
- Chalk pencils for dark fabrics.
- Heat-erase pens only if tested first.
- Printed templates for alignment checks.
Mark the center line and placement height before hooping.
- Hooping sleeves need care and patience.
- Use sleeve hoops when possible.
- Magnetic hoops reduce fabric stress.
- Hoop fabric and stabilizer together.
- Avoid stretching the sleeve during hooping.
If hooping feels tight, stop and reset. Forced hooping causes distortion.
Once the basics are right, advanced techniques help improve finish and durability.
Sleeves curve around the arm, so straight satin stitches can pull.
- Reduce satin width on curves.
- Add proper underlay for support.
- Slow the machine for smoother turns.
- Avoid long satin stitches on sharp curves.
Curved satin stitches should follow the sleeve shape.
- Sleeves move as the garment moves.
- Rotate designs slightly to match sleeve angle.
- Avoid large horizontal text.
- Vertical layouts work better on long sleeves.
- Always preview the stitch path before sewing.
Good orientation keeps the design readable when worn.
- Puckering ruins sleeve embroidery if ignored.
- Check stabilizer strength.
- Reduce stitch density.
- Balance top and bobbin tension.
- Slow down stitching speed.
Fix puckering early. Continuing will only make it worse.
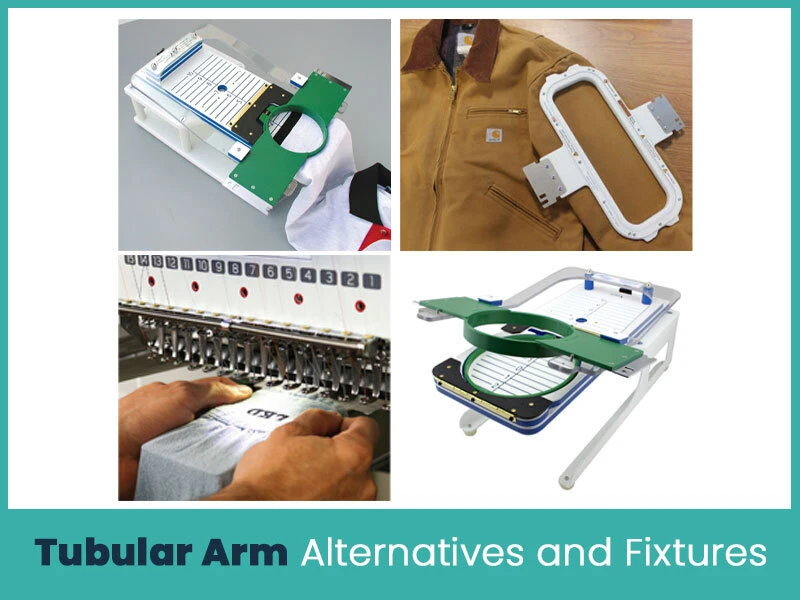
If your machine lacks a tubular arm, alternatives exist.
- Flat-bed fixtures support narrow garments.
- Sleeve clamps hold fabric securely.
- Partial hooping systems reduce bulk.
These options allow controlled stitching without opening seams.
Sleeve hoops are narrow and firm.
- Ideal for logos and names.
- Reduce excess fabric interference.
- Improve stitch accuracy.
These are a smart investment for frequent sleeve work.
Multi-frame kits give flexibility.
- Multiple hoop sizes in one set.
- Easy switching between placements.
- Useful for mixed garment types.
- They save time and space.
Freestyle fixtures allow free movement.
- Helpful for curved designs.
- Reduce garment twisting.
- Require practice for best results.
They work well for experienced users.
Even flat machines can handle sleeves.
- Turn sleeves inside out.
- Roll excess fabric tightly.
- Secure with clips or tape.
- Stitch slowly and monitor movement.
Careful workflow prevents needle strikes and fabric drag.
Embroidery quality depends on managing stretch and bulk. With the right stabilizers, hooping, and finishing, you can remove puckers and distortion.
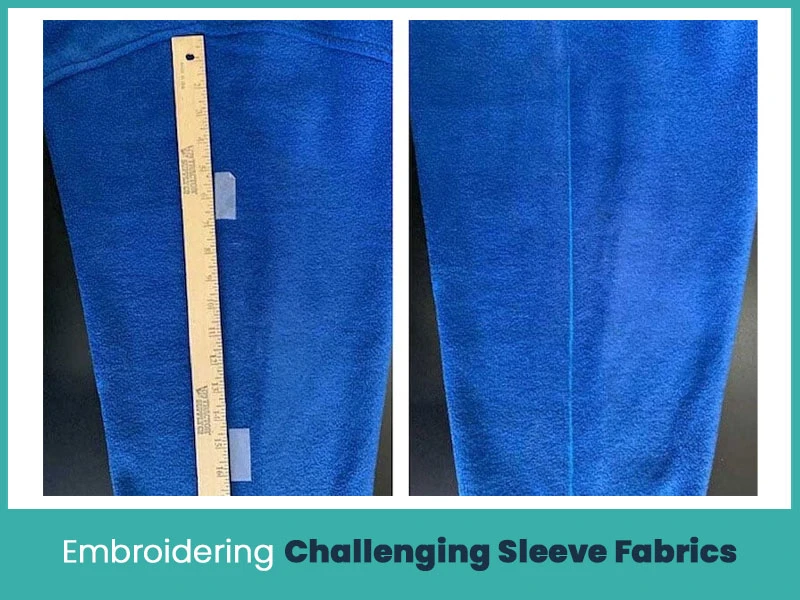
Stretch sleeves need extra control.
Choose the Right Stabilizer: Always use cutaway on stretch fabrics. For delicate knits, fuse lightweight backing before hooping.
Prep Like a Pro: Lightly spray starch and press dry to reduce fabric movement.
Hooping Technique: Hoop fabric and stabilizer together. Use tape or basting if edges shift.
Thread and Needle Choices: Polyester thread works best. Use a sharp 75/11 needle.
Tension and Stitch Adjustments: Reduce density and slow the machine. Test first.
Post-Stitching Care: Trim stabilizer carefully. Avoid harsh pulling.
Thick sleeves like hoodies and jackets need strength.
- Use firm cutaway stabilizer.
- Choose size 80/12 needle.
- Reduce stitch density.
Check seam thickness before stitching.
Magnetic hoops help with bulky sleeves.
- Even tension distribution.
- Less fabric distortion.
- Faster setup.
Workflow Tips
- Trim excess fabric.
- Secure seams away from needle path.
- Stitch slower on heavy areas.

Good placement improves comfort and appearance.
Short Sleeves
- Design size: Max 3 inches.
- Placement: 1 inch above hem.
- Center using shoulder seam.
Long Sleeves
- Placement: 4–5 inches below shoulder seam.
- Design height: 2–3.5 inches.
- Best for vertical text.
Cuffs
Max height: 2 inches.
Text size: 1/4 to 3/8 inch.
Fold cuff to find center.
Layout Examples
Pro Tips
- Always print a template.
- Use crease alignment
- Measure twice before hooping.
Names and simple symbols work best.
- Clean fonts improve readability.
- Minimal quotes look modern.
- Tone on tone stitching adds depth.
Use finger method, crease lines, or target stickers for accuracy.
Use no-show mesh for thick fabrics.
- Add water-soluble topper when needed.
- Adjust underlay for fabric weight.
- Test every design before final stitching.
- Opening seams gives full access.
- Cut seam carefully.
- Embroider flat.
- Reseam with matching thread.
This method delivers the cleanest results on tight sleeves.
- Sleeves are not flat.
- Adjust stitch angles.
- Reduce pull compensation.
- Avoid long stitch paths.
Good digitizing makes sleeve embroidery smooth and durable.
Sleeves embroidery needs patience, planning, and the right techniques. When you understand stabilizers, hooping methods, fabric nature, and placement rules, sleeves embroidery will be easy for you. They become another creative space for clean and professional embroidery.
Nick William has been immersed in the world of embroidery digitizing for over 20 years, earning 25 industry awards throughout his career. As a 3rd generation embroidery expert, Nick’s journey started in his family’s workshop, where he learned the art of digitizing before the rise of modern software. He has worked with leading commercial embroidery businesses and has shared his expertise with over 75,000 home and professional embroiderers. As an author at True Digitizing, Nick is passionate about teaching others how to create beautiful, precise designs through easy-to-follow tutorials and expert advice.
Categories

Top Best Embroidery Digitizing Software in 2026
06-05-2026
")
Best Multi-Needle Embroidery Machines for Startups 2026
28-02-2026

DST File: The Complete Guide (What It Is, How to Create, Convert & Use in 2026)
28-02-2026

Janome 550E vs Baby Lock Flare | Best Mid-Range Embroidery Machine?
26-02-2026

Choose the Right Fabric for Embroidery
20-02-2026

Advanced Techniques in Embroidery Digitizing
19-02-2026

Most Common Types of Threads to Use in Machine Embroidery
12-02-2026

AI in Embroidery | Revolutionizing Art and Efficiency
12-02-2026

Best Thread Tension 101 | A Guide for Embroidery Machines
09-02-2026

Mastering Small Lettering in Machine Embroidery
04-02-2026
Asked Questions


