
At True Digitizing, we transform your creative spark into flawless, high-quality embroidery digitized designs that bring your vision to life.
Our Blogs
We Accept
Copyright 2025 Truedigitizing
At True Digitizing, we transform your creative spark into flawless, high-quality embroidery digitized designs that bring your vision to life.
We Accept
Copyright 2025 Truedigitizing

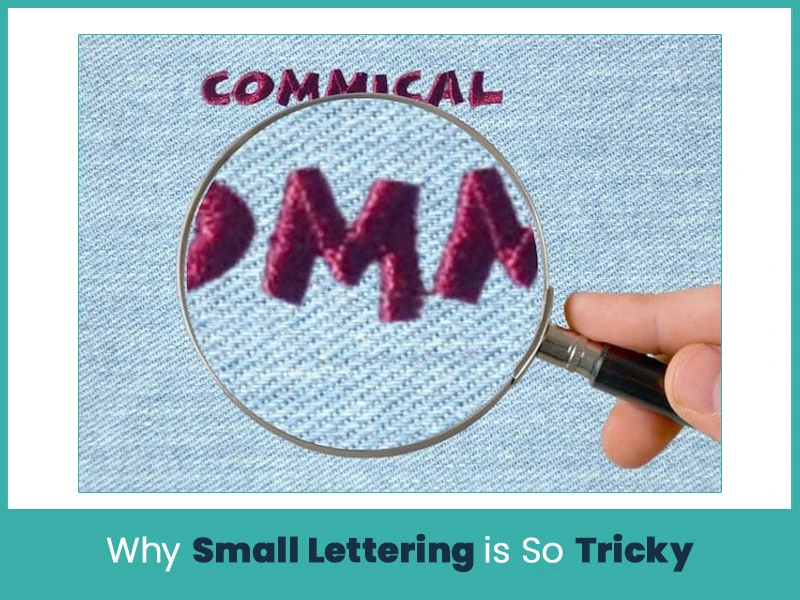
Small lettering looks simple until you stitch it. One tiny word can decide whether a design looks clean or messy. Letters that are too close blur together. Thin strokes disappear. Edges turn rough. This is why many embroiderers avoid small text or accept poor results.
The good news is that small lettering can stitch clean and sharp if it is planned the right way. It is not about luck. It is about setup, digitizing, and testing. Once you understand what really affects tiny letters, your results improve fast.
This guide explains everything so you will be proficient at doing small letter embroidery designs.
Small lettering pushes embroidery machines to their limits. The space is tight, and thread does not behave the same way it does in larger designs.
Here are the main reasons small text fails:
- Thread thickness takes up space and fills details fast.
- Fabric movement causes letters break or spread.
- High stitch density creates bulk and blurs edges.
- Wrong fonts lose shape when reduced.
- Too many trims create uneven starts and stops.
When letters are under 4mm, even small mistakes show clearly. That’s why small lettering needs special handling from the start.
A sharp needle makes a big difference. It pierces fabric cleanly instead of pushing it down. This helps letters stay visible.
Best choices:
-Needle size: 65/9 or 70/10.
- Thread: 60-weight thread for fine details.
Thinner thread gives more space for detail and reduces thread buildup.
Font choice plays a major role in small lettering quality. Some fonts look clean on a screen but fail when stitched because fabric and thread behave differently from pixels.
Good embroidery fonts have:
- Clean strokes that hold shape after stitching.
- Open spacing so letters do not merge.
- No extra decoration that adds stitch clutter.
Avoid fonts with curls, thin tails, or narrow gaps. These details disappear when stitched at small sizes and make letters unreadable. Block-style fonts work best because they keep their form even when reduced. Always check how the font looks at the final stitch size, not at full screen view.
Small lettering has physical limits. Thread takes space, and machines cannot stitch below certain widths without distortion.
General rule:
- 3mm works as the safe minimum for most embroidery machines.
- Below 3mm needs expert digitizing and careful testing.
When text must stay very small, simplify the design. Reduce fine details and avoid thin strokes. Forcing detail into tiny letters leads to thread buildup and fabric damage. Clear and simple letters always read better than detailed ones at small sizes.
Small letters need a strong base to stitch cleanly. Fabric movement ruins tiny text faster than any other issue.
Always:
- Use the right stabilizer for the fabric.
- Match stabilizer strength to fabric weight.
- Hoop fabric tight and flat, not stretched.
Soft or loose fabric tears under stitches and pulls letters out of shape. A stable base keeps stitches on the surface and helps letters stay sharp and even from start to finish.
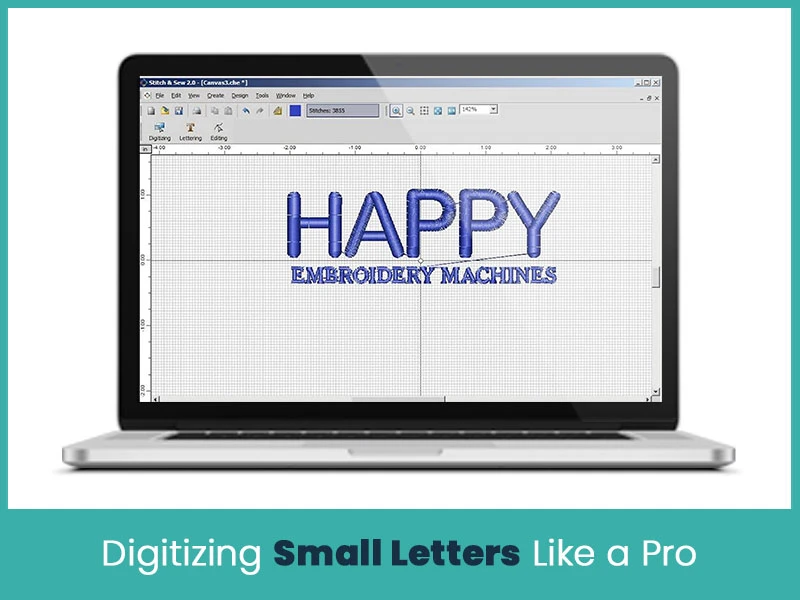
Auto-digitizing struggles with small lettering. It adds too many stitches and ignores space limits. Manual digitizing gives full control over stitch flow and density.
Proper digitizing focuses on:
- Fewer stitches to reduce bulk.
- Clean stitch paths that follow letter shapes.
- Balanced density to avoid thread buildup.
Good digitizing keeps letters readable instead of thick and large. Each stitch should serve a purpose. When stitches overlap or stack, small letters lose clarity fast.
Testing protects the final product. Small lettering reacts differently on each fabric type.
Always test on:
- The same fabric.
- The same stabilizer.
- The same thread and needle.
Testing reveals problems like gaps, thread breaks, or sinking stitches before production starts. Adjust settings based on real results. One test run can prevent wasted fabric and rework later.
Good digitizing is the real key to clean small text. This is where most designs succeed or fail.
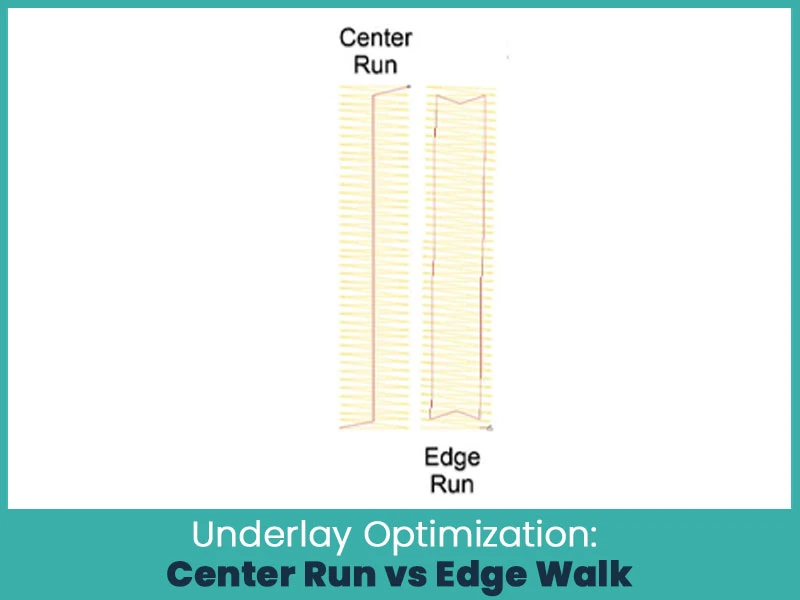
Underlay stitches are the quiet support system of small lettering. They hold fabric steady and support top stitches. But too much underlay ruins small letters.
When to use each underlay:
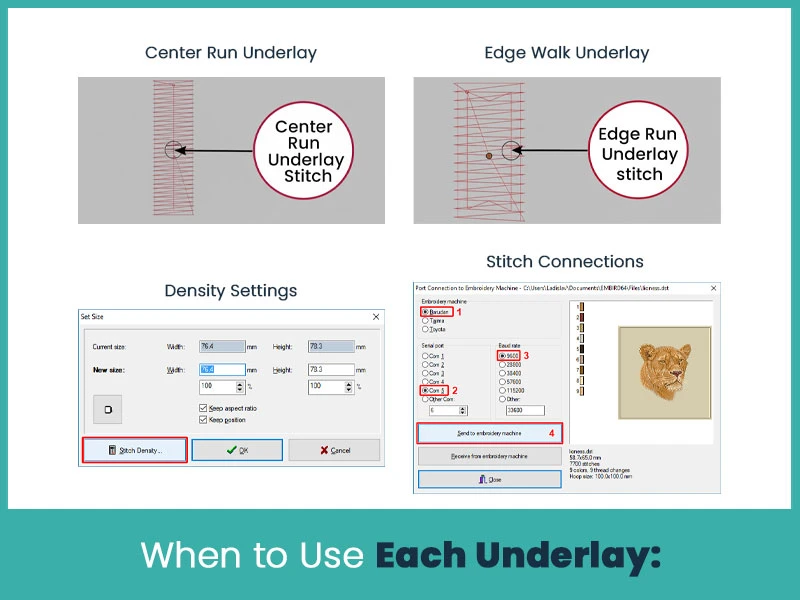
Best for letters under 4mm. A single stitch line down the center gives support without bulk. It keeps letters from sinking while staying hidden.
Works for slightly larger letters where shape needs help. It stitches along the outline. Avoid this for very small text because it crowds the design.
- Reduce density to about 0.45mm for small letters.
- Lower density prevents thread buildup and fabric damage.
- Use running stitch underlay with 1.8mm stitch length for columns as narrow as 0.7mm.
Stitch connections:
- Remove unnecessary trims.
- Connect letters using running stitches.
- Fewer stops mean smoother results.
Always test using free machine embroidery designs on your actual fabric. Adjust settings based on real stitching, not software defaults.
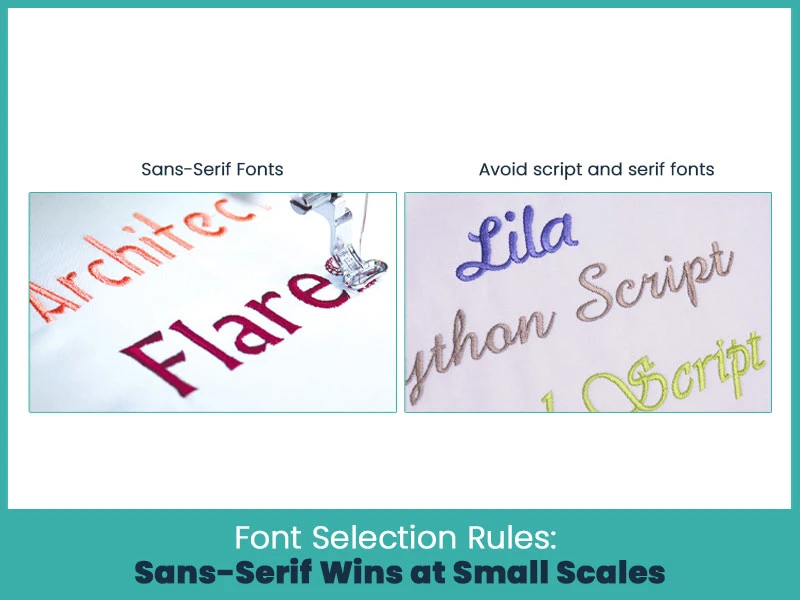
Font choice decides whether small text reads clearly or not.
What works best:
Simple block fonts like Arial or Micro Block stay readable at 3mm and below. Clean lines hold shape better.
Decorative details disappear at small sizes. Serifs turn messy. Scripts lose flow.
- Remove serifs and extra details.
- Simplify shapes in the software.
- Reduce stitch count without losing form.
- Pre-adjust height to prevent distortion.
Fonts designed for embroidery already include shrinkage control, which helps small text stay true to size.
Helpful reminders from industry practice:
- Keep stitch length above 1mm.
- Reduce trim points.
- Test multiple fonts before final production.
Small lettering adds value to embroidery. It carries names, dates, brands, and fine details that large text cannot.
It is important for:
- Logos.
- Uniforms.
- Hats.
- Labels.
Promotional items
Clean small lettering shows skill. It tells customers that the work is professional and carefully done.
Mastering small lettering in machine embroidery takes patience, not shortcuts. The right needle, thread, font, stabilizer, and digitizing settings work together. When even one step is rushed, small text fails.
If you want clean, readable, and professional small lettering without wasting time on trial and error, expert digitizing makes all the difference. True Digitizing specializes in embroidery digitizing that handles small text with precision and care. From font selection to stitch balance, every detail is optimized for real stitching results.
Nick William has been immersed in the world of embroidery digitizing for over 20 years, earning 25 industry awards throughout his career. As a 3rd generation embroidery expert, Nick’s journey started in his family’s workshop, where he learned the art of digitizing before the rise of modern software. He has worked with leading commercial embroidery businesses and has shared his expertise with over 75,000 home and professional embroiderers. As an author at True Digitizing, Nick is passionate about teaching others how to create beautiful, precise designs through easy-to-follow tutorials and expert advice.
Categories

Top Best Embroidery Digitizing Software in 2026
06-05-2026
")
Best Multi-Needle Embroidery Machines for Startups 2026
28-02-2026

DST File: The Complete Guide (What It Is, How to Create, Convert & Use in 2026)
28-02-2026

Janome 550E vs Baby Lock Flare | Best Mid-Range Embroidery Machine?
26-02-2026

Choose the Right Fabric for Embroidery
20-02-2026

Advanced Techniques in Embroidery Digitizing
19-02-2026

Most Common Types of Threads to Use in Machine Embroidery
12-02-2026

AI in Embroidery | Revolutionizing Art and Efficiency
12-02-2026

Best Thread Tension 101 | A Guide for Embroidery Machines
09-02-2026

How to Do Machine Embroidery on Sleeves Like a Pro
04-02-2026
Asked Questions


