
Embroidery Underlay Stitching is Important To Use in Embroidery Designs
Many embroiderers focus only on top stitches because those are the stitches they can see. They increase density to fix gaps, add extra layers, and still struggle with puckering or breaking stitches. These problems don't improve because the foundation stays weak.
Embroidery underlay stitching creates that foundation. It supports the fabric, guides the top stitches, supports structure, coverage, and improves overall stitch quality. Once you understand how underlay works, embroidery becomes easier to control and far more consistent, plus it helps digitizers to control density and avoid heavy, stiff embroidery. That's why underlay is one of the most important parts of embroidery design.
In this guide, you'll understand what is embroidery underlay stitching, why it is so important to use it in embroidery designs and so on, so next time you will create embroidery designs without mistakes.
Understanding Underlay Stitches in Embroidery
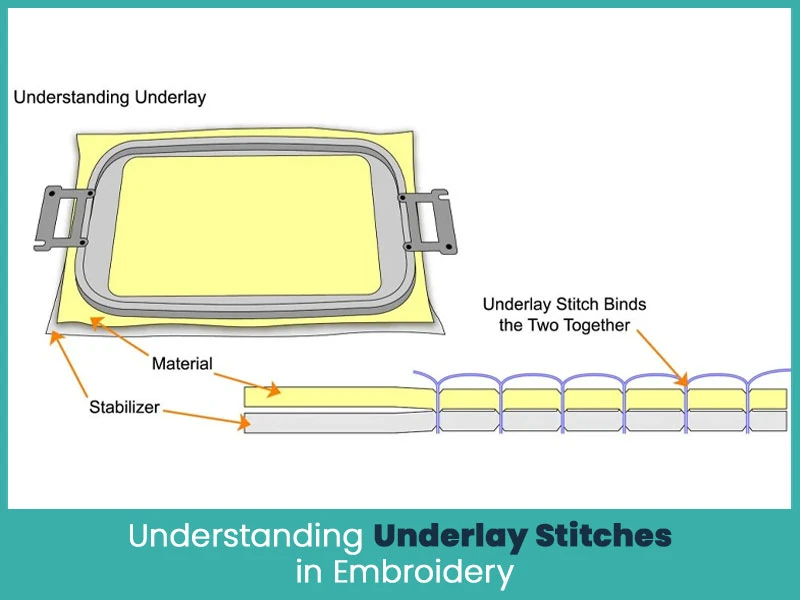
Underlay stitches are the first stitches that the embroidery machine places on the fabric. These stitches sit between the fabric and the visible top stitching. You don't see them clearly in the final design but they support everything above them.
In embroidery digitizing, underlay stitches prepare the fabric surface. They control movement, reduce stretch, and create a smooth base. Without underlay, top stitches sit directly on fabric, which usually causes distortion and poor coverage.
Underlay stitching changes based on fabric type, stitch style, and design size. A thin cotton shirt needs a different underlay than a thick hoodie or cap. This decision separates clean embroidery from low quality work.
Why are Underlay Stitches So Important in Embroidery Designs?
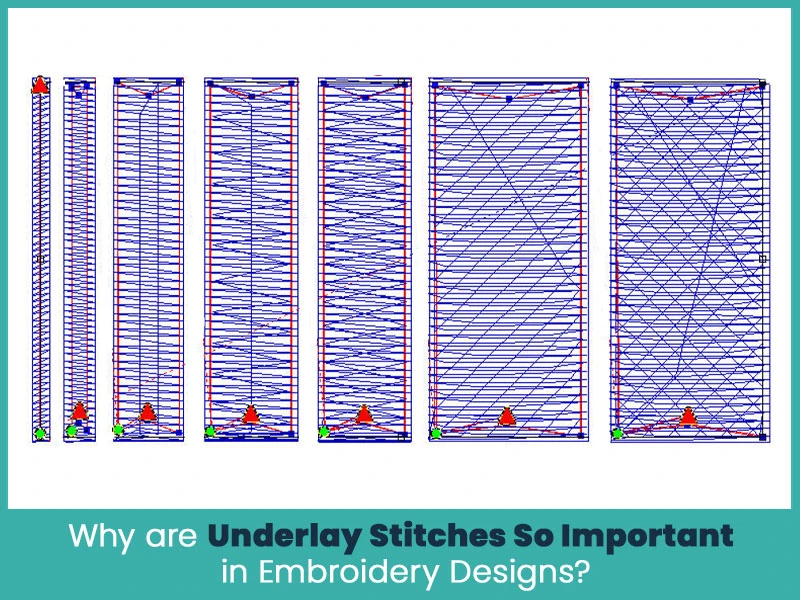
Embroidery underlay stitching controls how the design behaves on fabric. Fabric moves, stretches, and reacts to needle pressure. Underlay helps manage these changes.
When underlay stitching works correctly, the design stays sharp. Letters hold their shape. Edges stay clean. The embroidery looks balanced instead of heavy or loose.
Without proper underlay, digitizers often increase stitch density to fix coverage problems. This creates stiff embroidery and thread breaks. Underlay solves these problems in a cleaner and more controlled way.
Embroidery Underlay Stitching Has 6 Basic Functions
1. It attaches the garment to the backing, creating a stable surface and smooth placement for the top stitching.
Underlay stitches lock the fabric to the stabilizer. This connection stops fabric movement during stitching. The top stitches then enter on a flat and steady surface.
2. It helps to reduce the amount of give in the fabric
Stretch and soft fabrics move easily under the needle. Underlay tightens the fabric gently, so stitches stay in place instead of spreading.
3. It hides the color of the fabric that will be covered with stitching
Dark or bright fabrics can show through light thread. Underlay blocks fabric color and improves thread coverage without adding heavy top stitches.
4. It helps to reduce the density of the top stitching
Proper underlay allows digitizers to lower top stitch density. This keeps embroidery flexible and smooth while still looking full.
5. It stops the fabric from puckering
Puckering happens when stitches pull fabric inward. Underlay divide stitch tension evenly, which keeps the fabric flat after embroidery.
6. It keeps the stitches from breaking into the fabric
Thick or fuzzy fabrics break stitches. Underlay lifts the top stitches and keeps them visible and sharp.
Reasons to Use Underlay
Underlays are the foundation for the top layer of the embroidery, just like a building needs a strong base, embroidery needs underlay. Without it, top stitches lose control and balance.
1. They connect fabric and stabilizers
Underlay holds fabric and stabilizer together. This connection improves stitch accuracy and reduces design movement.
2. They give stability to the fabric and prevent distortion
Stable fabric produces clean edges and even stitch flow. Underlay keeps fabric from shifting during embroidery.
3. They prevent top layer stitches from breaking into the fabric
This matters most for fleece, towels, caps, and thick garments where stitches easily disappear.
4. Underlays also contribute to coverage
Good underlay allows lighter top stitching while still achieving solid coverage.
5. Underlays add dimension
Underlay creates lift and structure, which improves the overall appearance of embroidery.
6. Underlays help to clearly define the edges of the top layer
Sharp edges make embroidery look professional. Underlay supports clean borders and shapes.
Different Types of Embroidery Underlay
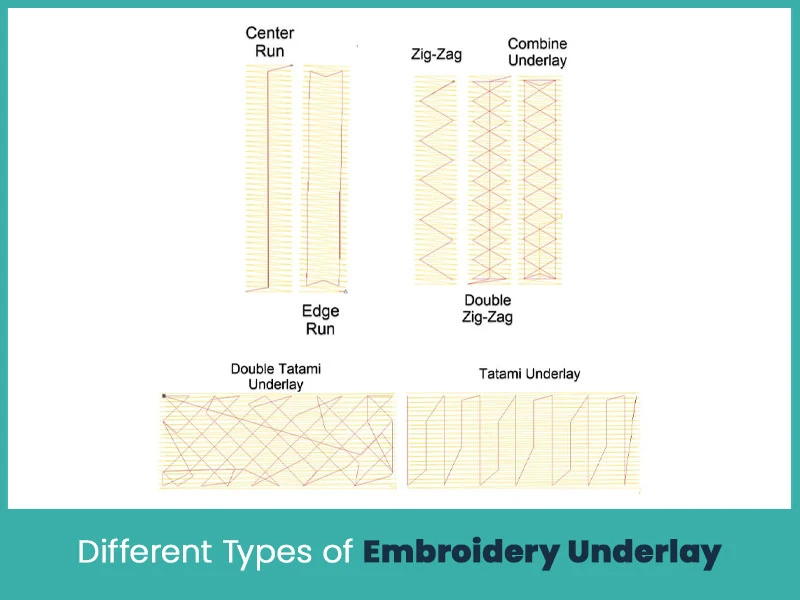
Center Run Underlay
This underlay uses a single running stitch through the center of columns or text. It works well for small lettering and narrow satin stitches. It controls stretch without adding bulk.
Edge Run Underlay
Edge run underlay places stitches near the borders of shapes. It defines edges and supports clean outlines, especially for satin stitches.
Zigzag and Double Zigzag Underlay
Zigzag underlay spreads stitches across the shape. Double zigzag adds extra strength for stretchy or soft fabrics. These underlays improve coverage and stability.
Fill-Stitch Underlay
Fill underlay uses light fill stitches under large filled areas. It controls fabric movement and reduces the need for heavy top fill stitching.
Stitch Length Underlay
Adjusting stitch length in underlay controls how firm or flexible the base feels. Shorter stitches increase control, while longer stitches keep embroidery smooth.
Using Underlay in Your Embroidery Software
Most embroidery software includes underlay settings, but default values rarely fit every design. Digitizers must adjust underlay based on fabric, stitch type, and design size.
Good digitizing software allows control over underlay type, angle, spacing, and stitch length. Learning these controls helps produce consistent and clean embroidery results.
Relying on automatic settings causes poor results. Manual adjustments bring better quality and fewer machine issues.
Conclusion
Embroidery underlay stitching plays a key role in every successful embroidery design. It supports fabric, controls stitch behavior, and improves the final look. When underlay works perfectly, embroidery looks clean, balanced, and professional.
If controlling underlay and stitch density feels confusing, there is no need to struggle. True Digitizing is here to help. We digitize embroidery designs with proper underlay planning, balanced stitch density, and fabric-specific settings. We focus on quality, accuracy, and fast delivery.
Send your design to True Digitizing today and get embroidery files that stitch clean the first time.
Author
Nick William
Embroidery Digitizer
Nick William has been immersed in the world of embroidery digitizing for over 20 years, earning 25 industry awards throughout his career. As a 3rd generation embroidery expert, Nick’s journey started in his family’s workshop, where he learned the art of digitizing before the rise of modern software. He has worked with leading commercial embroidery businesses and has shared his expertise with over 75,000 home and professional embroiderers. As an author at True Digitizing, Nick is passionate about teaching others how to create beautiful, precise designs through easy-to-follow tutorials and expert advice.
Categories

How to Remove Embroidery From Any Fabric — Step-by-Step Guide 2026
28-06-2026

Embroidery Trends 2026: What's Hot in Machine & Hand Embroidery | TrueDigitizing
26-06-2026

Top Best Embroidery Digitizing Software in 2026
06-05-2026
")
Best Multi-Needle Embroidery Machines for Startups 2026
28-02-2026

DST File: The Complete Guide (What It Is, How to Create, Convert & Use in 2026)
28-02-2026

Janome 550E vs Baby Lock Flare | Best Mid-Range Embroidery Machine?
26-02-2026

Choose the Right Fabric for Embroidery
20-02-2026

Advanced Techniques in Embroidery Digitizing
19-02-2026

Most Common Types of Threads to Use in Machine Embroidery
12-02-2026

AI in Embroidery | Revolutionizing Art and Efficiency
12-02-2026
Frequently
Asked Questions


RELATED BLOGS


At True Digitizing, we transform your creative spark into flawless, high-quality embroidery digitized designs that bring your vision to life.
Our Blogs
We Accept
Copyright 2025 Truedigitizing