
At True Digitizing, we transform your creative spark into flawless, high-quality embroidery digitized designs that bring your vision to life.
Our Blogs
We Accept
Copyright 2025 Truedigitizing
At True Digitizing, we transform your creative spark into flawless, high-quality embroidery digitized designs that bring your vision to life.
We Accept
Copyright 2025 Truedigitizing

When people try 3D puff embroidery on hats for the first time, they expect a clean raised finish. But in many cases, the foam shifts, the stitches break, the design looks flat or the hat gets ruined. These problems make the process stressful, especially when you are working on hats with complex designs. The fact is, 3D puff embroidery on hats only turns out right when the design, machine, foam and stitching all work together.
This guide covers everything in a simple and practical way so you can get a bold, smooth and clean raised look every single time.
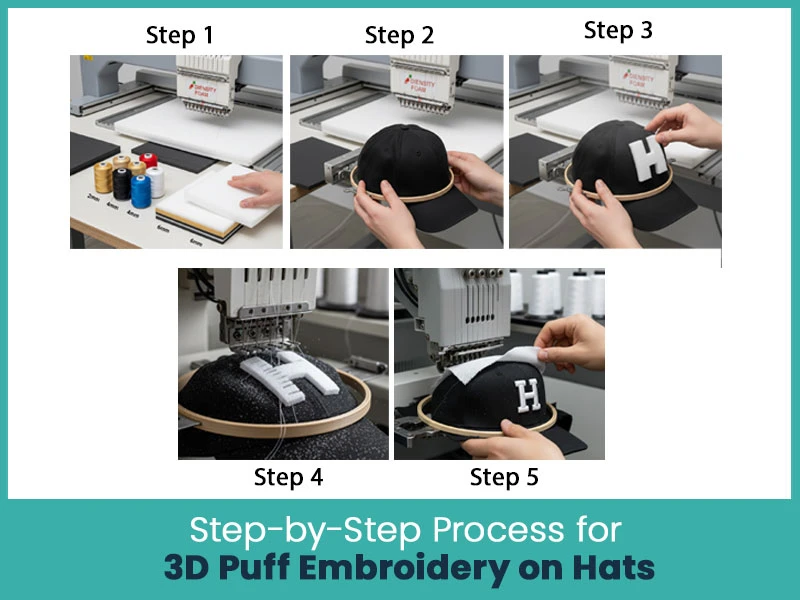
3D puff embroidery on hats needs a steady process. When each step is done right, the raised look is sharp and professional.
Use high density embroidery foam that matches your thread color.
Most people use 2mm to 6mm foam, depending on how long they want the raised look.
Make sure the hat is tight and set straight in the hoop. A loose hat causes uneven stitches.
Put the foam exactly on top of the area where the design will stitch.
You can use light spray adhesive so the foam stays in place.
The first stitches will perforate the foam. As long as the design is digitized correctly, the thread will cut the foam cleanly.
When the stitching is done, peel off the extra foam and clean the edges for a neat raised effect.

3D puff embroidery on hats depends more on digitizing than anything else. If the file is wrong, the design will never look raised.
Here’s what matters:
- Use simple and bold shapes.
- Avoid thin outlines.
- Add open spaces so the foam can expand.
- Use wide satin columns, not fill stitches.
- Punch the corners so the thread can seal the foam.
- Add an underlay to hold the design.
- Make sure the satin stitch density is enough to cover the foam.
A clean digitized file is the main reason a 3D puff logo looks sharp instead of messy.
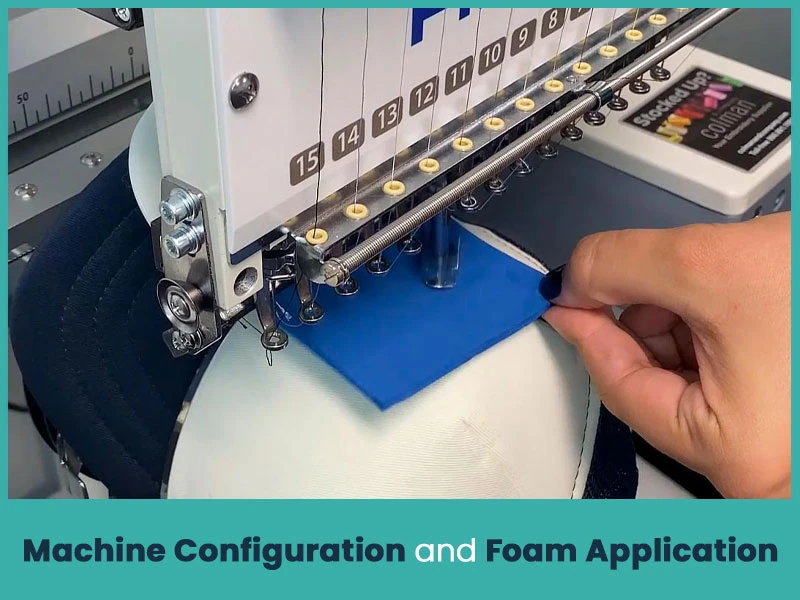
- Your embroidery machine settings also play a big role.
- Reduce the stitch speed to avoid foam shifting.
- Use a sharp needle so the thread cuts the foam cleanly.
- Increase stitch density for better coverage.
- Lower the thread tension for smooth raised stitching.
- Place the foam carefully before starting satin stitches.
If the foam is very soft or the machine is so fast, the designs become flat instead of raised.
When the stitching begins, check the following:
- The satin stitches should hit the foam evenly.
- The edges must be sealed to prevent the foam from sticking out.
- There should be no loose threads or gaps.
- The foam should not move during stitching.
If the stitches don’t cut the foam completely, increase density or slow down the speed.
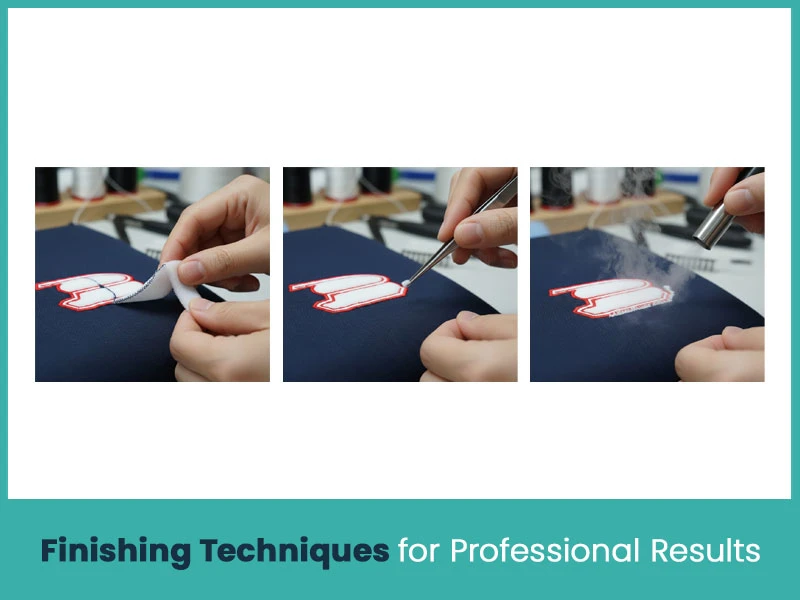
- A strong finish makes the design look clean.
- Peel off the extra foam gently.
- Use tweezers to remove small pieces.
- Use heat or a small steamer to shrink leftover foam.
- Brush the stitching lightly to lift the thread.
These small steps make the raised effect more defined and cleaner.
Most of the time, the remaining foam will break off easily because the satin stitches have cut it.
For stubborn edges, use:
- A small heat gun.
- Tweezers.
- A lint brush.
Don’t pull too hard because it can distort the stitching.

3D puff works best on structured caps because they hold the foam shape well.
Below are the most reliable hats for raised designs.
This hat is firm and stable, which makes it great for 3D puff embroidery on hats. It holds the foam nicely and gives a clean raised finish.
This is one of the most popular caps for raised logos. The structured front panel supports the stitches well and helps keep the puff uniform.
This cap is known for its shape and durability. The firm crown helps the foam stay in place and gives a bold, clean raised look.
3D puff embroidery on hats looks impressive and attention grabbing when the design, foam and machine settings are all handled carefully. When you prepare the design properly, use the right foam and follow the correct stitching steps, the raised effect comes out smooth and professional.
If you ever feel stuck or face any trouble with hat embroidery or 3D puff digitizing, True Digitizing is always here to help. Our team creates clean, professional and accurate files that stitch smoothly without wasting time or materials.
Nick William has been immersed in the world of embroidery digitizing for over 20 years, earning 25 industry awards throughout his career. As a 3rd generation embroidery expert, Nick’s journey started in his family’s workshop, where he learned the art of digitizing before the rise of modern software. He has worked with leading commercial embroidery businesses and has shared his expertise with over 75,000 home and professional embroiderers. As an author at True Digitizing, Nick is passionate about teaching others how to create beautiful, precise designs through easy-to-follow tutorials and expert advice.
Categories

How to Remove Embroidery From Any Fabric — Step-by-Step Guide 2026
15-07-2026

Is SVG a Vector File? Yes — SVG vs EPS, PNG, PDF Vector Formats you need to know
08-07-2026

Embroidery Trends 2026: What's Hot in Machine & Hand Embroidery | TrueDigitizing
26-06-2026

Top Best Embroidery Digitizing Software in 2026
06-05-2026
")
Best Multi-Needle Embroidery Machines for Startups 2026
28-02-2026

DST File: The Complete Guide (What It Is, How to Create, Convert & Use in 2026)
28-02-2026

Janome 550E vs Baby Lock Flare | Best Mid-Range Embroidery Machine?
26-02-2026

Choose the Right Fabric for Embroidery
20-02-2026

Advanced Techniques in Embroidery Digitizing
19-02-2026

Most Common Types of Threads to Use in Machine Embroidery
12-02-2026
Asked Questions


