
At True Digitizing, we transform your creative spark into flawless, high-quality embroidery digitized designs that bring your vision to life.
Our Blogs
We Accept
Copyright 2025 Truedigitizing
At True Digitizing, we transform your creative spark into flawless, high-quality embroidery digitized designs that bring your vision to life.
We Accept
Copyright 2025 Truedigitizing

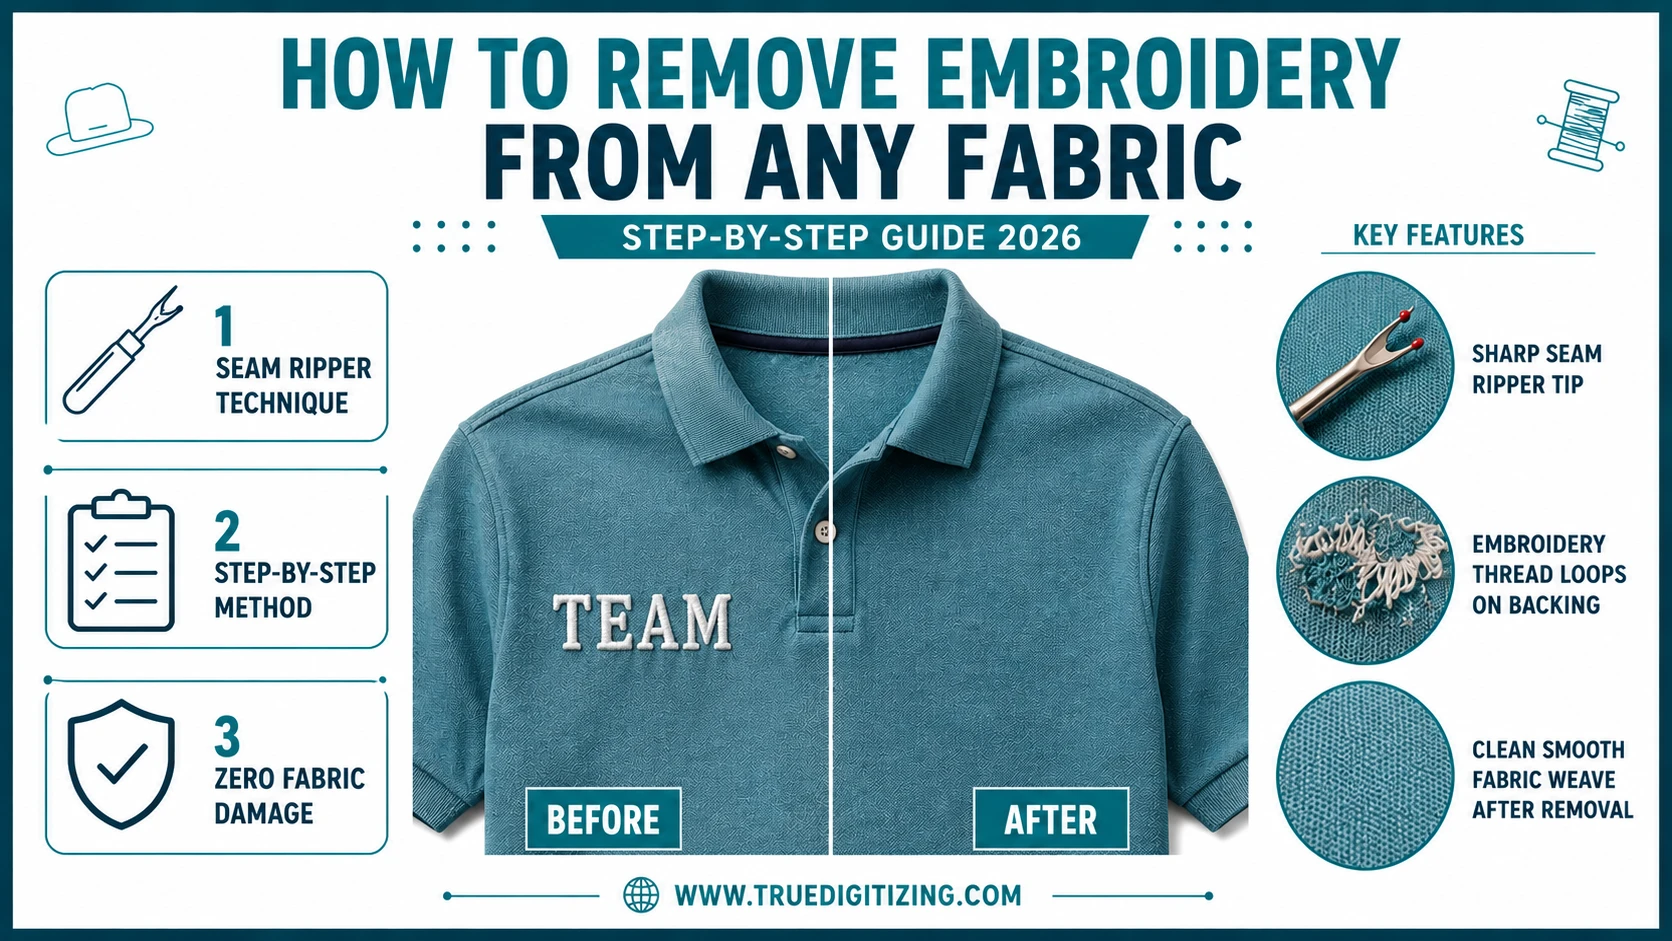
To remove embroidery from any fabric, turn the garment inside out, slide a seam ripper under the bobbin threads on the back, and cut them in small sections. Then flip the garment right-side out and pull the top threads out with tweezers. Finish by removing the stabilizer backing — tear-away peels off, cut-away must be trimmed, and water-soluble dissolves with water. Most fabrics come out clean with no lasting damage when you work slowly and carefully.
If you've ever stared at an embroidered logo on a jacket you'd otherwise love to keep wearing, you know exactly why you're here. Maybe the stitching is outdated. Maybe you bought the wrong size and want to resell it. Maybe a professional embroidery job went wrong and the design needs to come out before anything else can go back in.
The good news: removing embroidery is almost always possible. With the right technique, you can do it without damaging the fabric underneath. This guide covers everything — the tools you need, the step-by-step method, how to handle different garment types, and what to do once the stitching is out.
Need a fresh design after removal? Get a professionally digitized embroidery file delivered in 12 hours — ready for any machine.
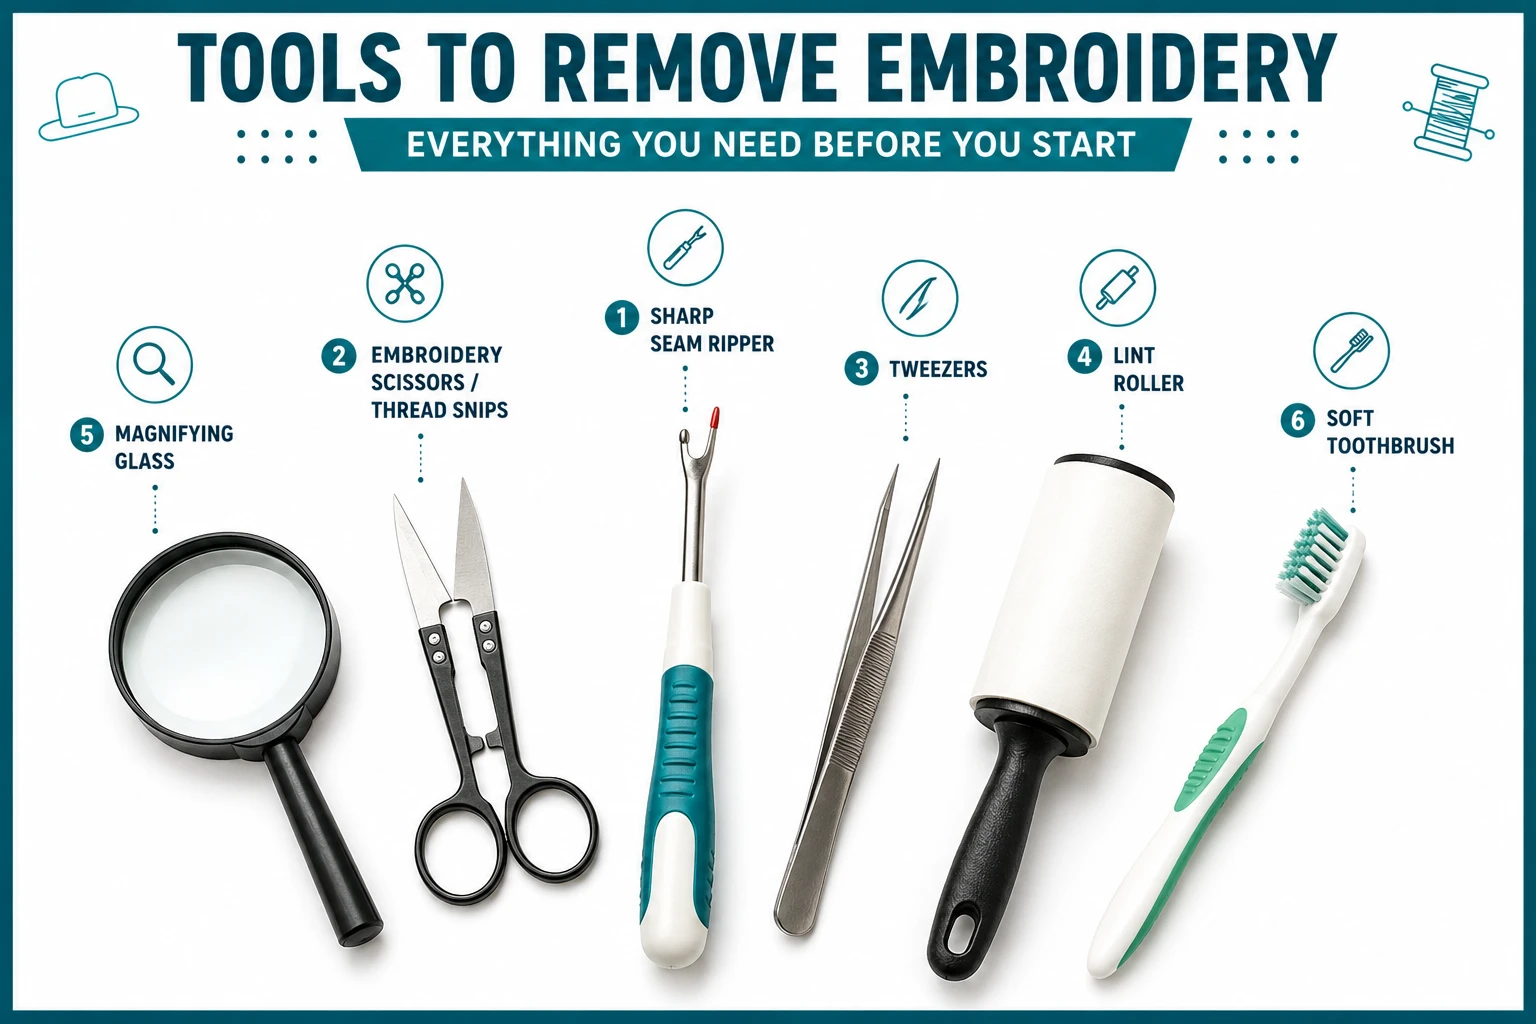
Get a Free QuoteYou don't need anything fancy. Most of these are already in a basic sewing kit:
This is the standard method that works on most garment types. It's controlled, precise, and when done right, leaves fabric clean.
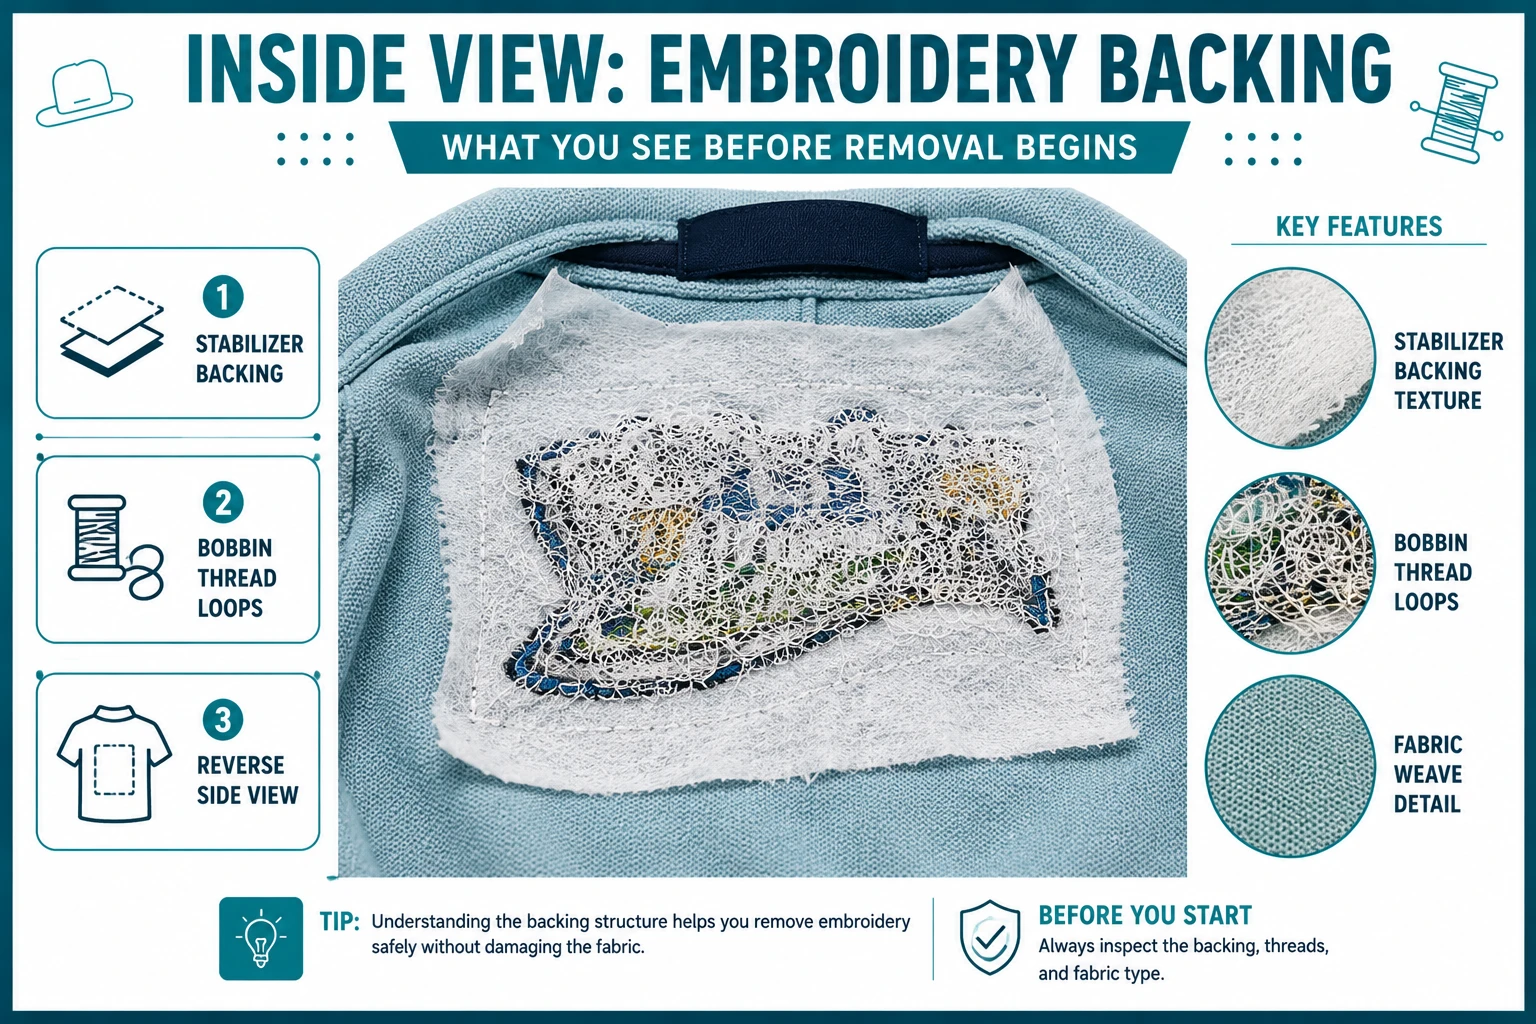
Flip the garment so the back of the embroidery is facing you. The backing stabilizer and thread bobbin loops will be visible on this side. This is where you'll start — not from the front.
Look for the loop stitches running across the back of the design. These are the bobbin threads. Slide the hook of your seam ripper under individual threads and cut them. Work in small sections — don't try to cut everything at once.
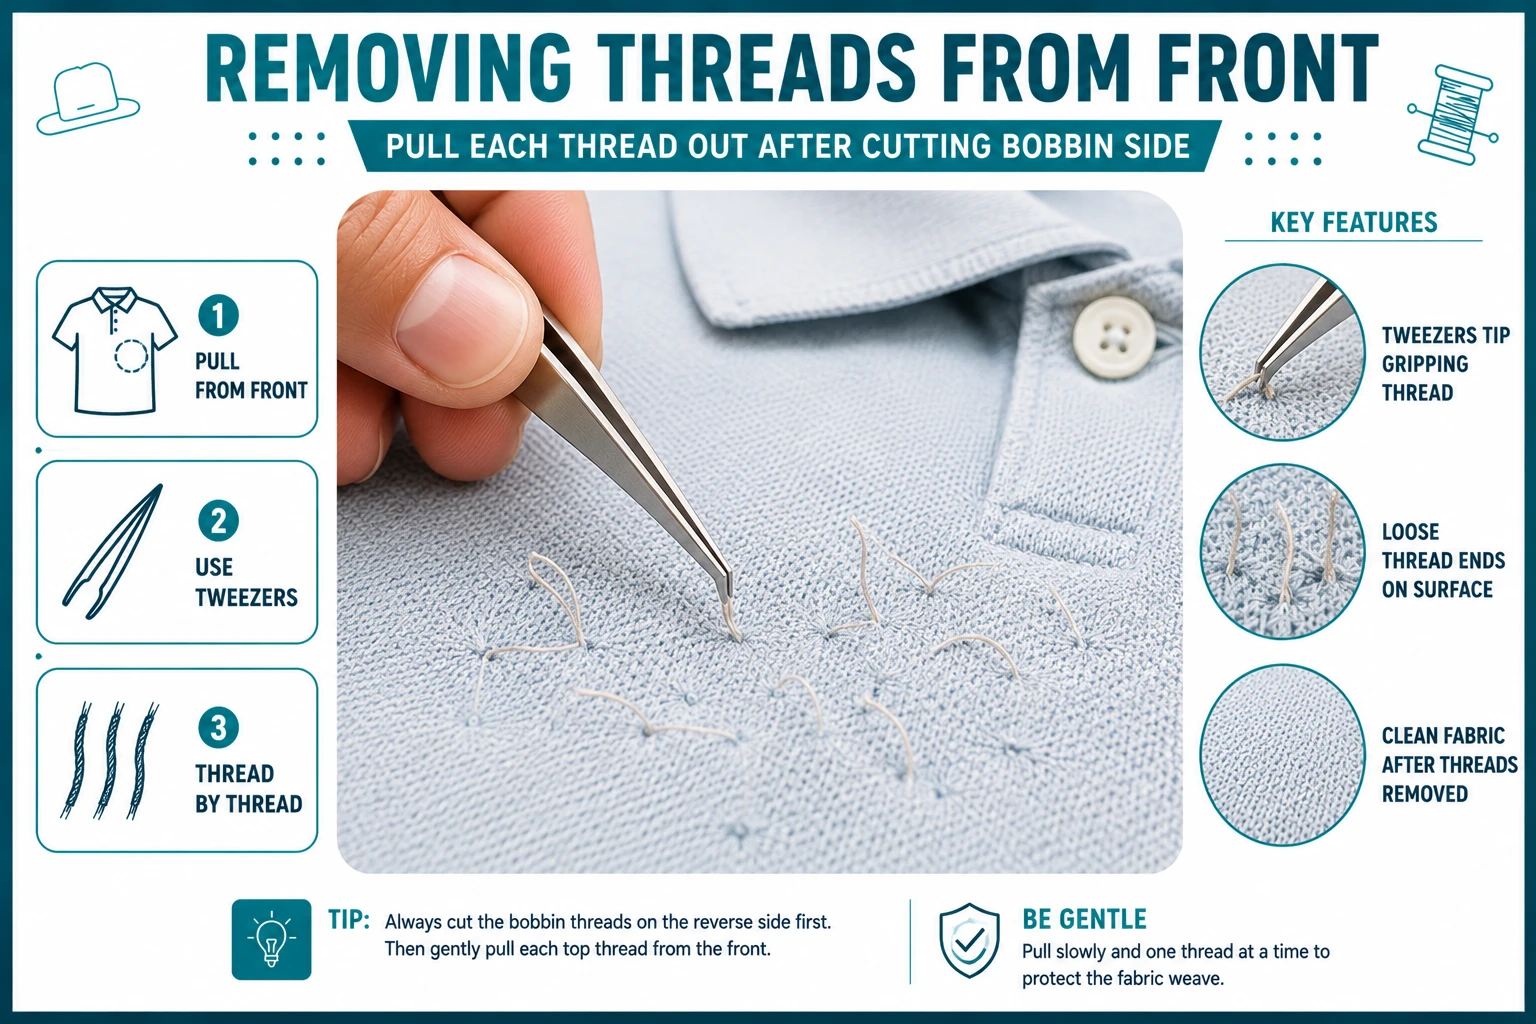
Once you've cut the bobbin threads on the back, flip to the front. You'll now be able to grab and pull the top threads out with tweezers. They should slide out cleanly once the bobbin threads have been cut beneath them.
Don't try to remove the entire design at once. Work across the design in small 1-inch sections — cut from the back, then pull from the front. This keeps you from distorting the fabric.
Once the threads are out, the stabilizer material is still attached to the fabric. How you remove it depends on the type:
Use the soft toothbrush to gently brush away any remaining thread bits caught in the fabric weave. Then go over the area with a lint roller. Hold the fabric up to light — any remaining threads will be visible and can be removed with tweezers.
No seam ripper? You can still get the job done — it just takes a little more care.
Use the tip of sharp embroidery scissors to snip individual threads on the back side, the same way you would with a seam ripper. It's slower but works well on smaller designs.
A disposable razor slid carefully under bobbin threads can cut them quickly on flat, stable fabrics like denim or canvas. Do not use this method on delicate fabrics — silk, chiffon, or thin cotton. One slip can damage the garment permanently.
These work well for large commercial designs with high stitch counts. If you're doing embroidery removal regularly, it's worth the investment.
Different fabrics and garment constructions behave differently. Here's what you need to know for the most common garment types.
Shirts are the most common scenario. The main risk is thin fabric — many dress shirts and polo shirts have a tight weave that can distort if you rush. Always work from the inside. For knit fabrics like t-shirts and jerseys, be extra careful because the weave can snag easily.
For left chest logo placements — the most common placement on work shirts and polos — the stabilizer is often tear-away, though cut-away is also used. Check the backing before assuming which type you have. For more on how stitch types affect removal, see our guide on embroidery digitizing tips.
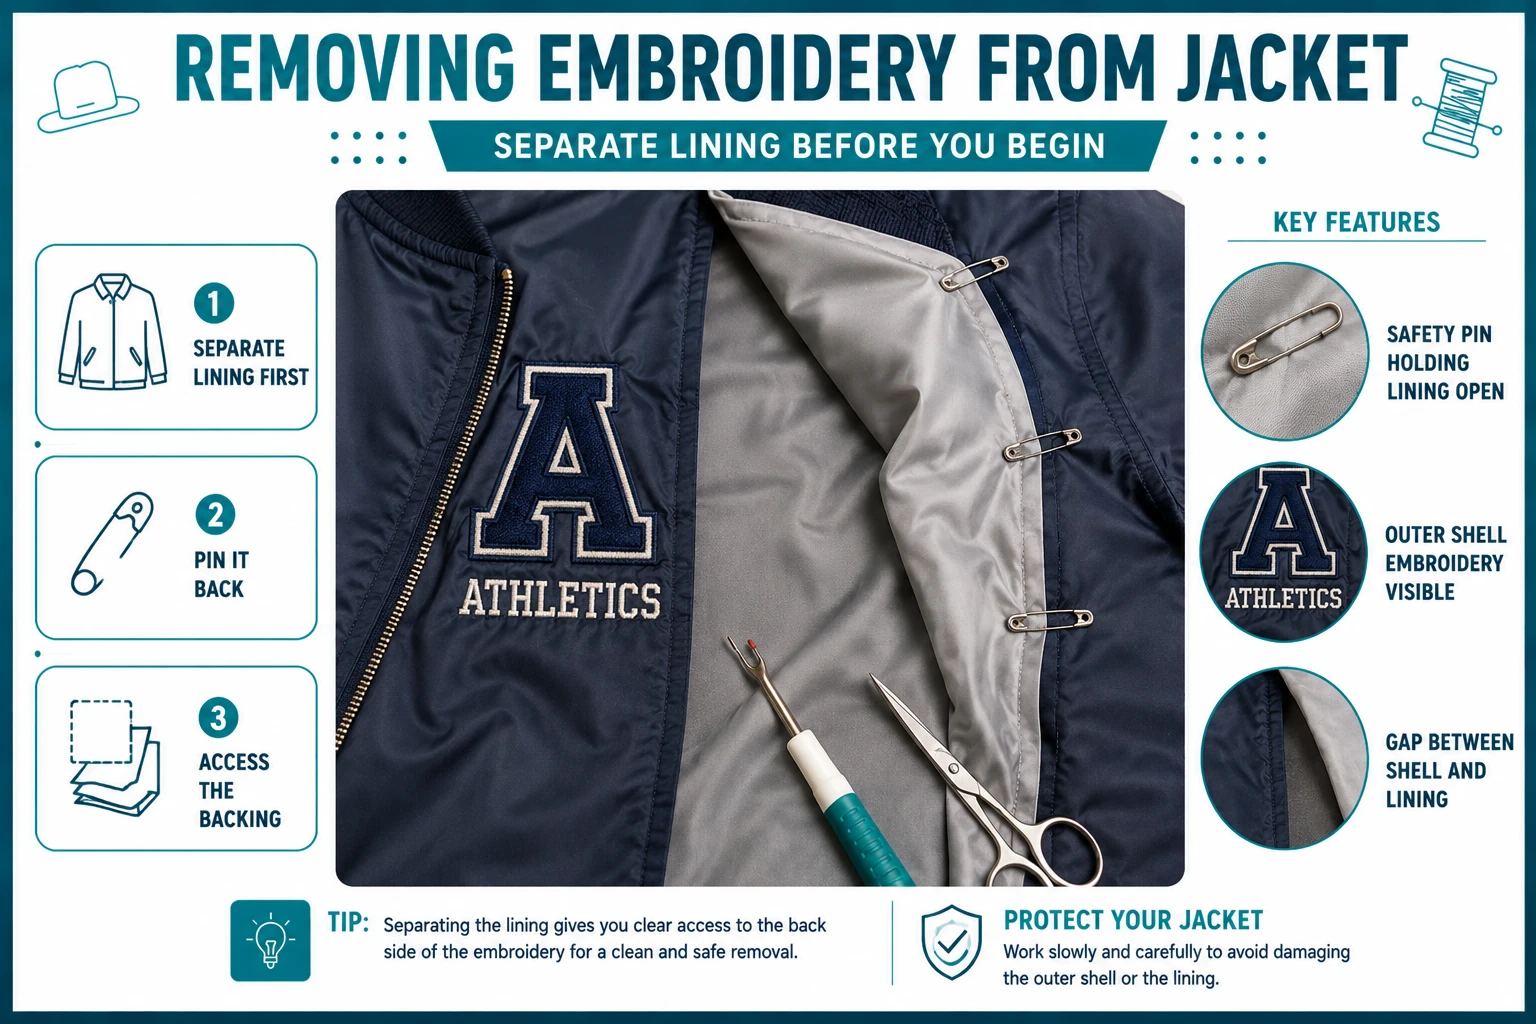
Jackets are often the trickiest because the outer shell is heavy but the lining beneath can be delicate. The key: keep the lining separated from the shell while you work. Pin or clip it out of the way before starting.
For structured jackets like blazers and work jackets, expect cut-away stabilizer on most logo placements. You won't be able to fully remove the backing, but you can trim it to a point where it's not visible from the outside.
Hats are difficult because the curved structure of the crown makes it hard to access the back of the design from the inside. A useful technique is to place a firm, curved object — such as a jar lid — inside the hat to create a stable surface to work against while you cut threads from the back.
Cut-away stabilizer is standard on structured hats like snapbacks and baseball caps. Trim it carefully with embroidery scissors rather than pulling — pulling can distort the structured panels. Learn why hat embroidery requires specific digitizing approaches in our article on embroidery machines for hats and shirts.
Backpacks usually have thick nylon or polyester shells. The seam ripper method works well on these materials since the weave is tight and resistant to damage. The main challenge is accessing the inside of the bag. Reach in through the main compartment opening to access the back of the embroidery area, and use a flashlight if needed to see the bobbin threads clearly before cutting.
These materials are thick and forgiving. The seam ripper method works well on all three. On denim, the tight weave holds up well even when working at a moderate pace. Scrubs are usually a poly-cotton blend — handled similarly to shirts but with slightly more fabric thickness.
For branded workwear with a name or company logo, the stabilizer type matters most. If it's cut-away, some residue will remain after trimming — but on dark scrubs or navy workwear, it's rarely visible once the garment is worn.
A company or brand logo often uses dense fill stitch, satin stitch, or a combination of both. This means more threads to remove compared to simple text. Budget more time — a 3-inch logo can take 20–30 minutes to remove cleanly.
Work in sections: start with the outline stitches, then work inward through the fill areas. Removing the outline first gives you cleaner access to the fill stitches underneath. To understand how different embroidery file formats and stitch settings impact removal difficulty, our embroidery digitizing guides cover this in detail.
Iron-on or sewn patches are different from direct embroidery. If the patch is sewn on, you're removing the border stitches that attach it to the garment — much faster than removing a full digitized design. Slide the seam ripper under the attachment stitches along the edge, work around the full perimeter, and the patch lifts away cleanly.
If it's an iron-on patch with heat adhesive backing, place a low-heat iron over the patch for a few seconds before lifting — the adhesive softens and releases. Then peel it back slowly and steadily.
Names and monograms are typically stitched in satin stitch — a column-style stitch where threads run in long, parallel lines across the letterform. Satin stitch is generally easier to remove than fill stitch because the threads are longer and release more cleanly once the bobbin thread is cut. Snip the bobbin threads at the back, and the top threads often pull out in long continuous segments.
Once threads are out, the stabilizer remains attached to the fabric. Use this table to find the right removal method for your backing type:
| Stabilizer Type | Removal Method | Result |
|---|---|---|
| Tear-Away | Grip at edge and tear away in small sections | Full removal in most cases |
| Cut-Away | Trim with sharp scissors as close to fabric as possible | Small amount stays permanently |
| Water-Soluble (wash-away) | Dampen area with cool water | Dissolves completely |
| Water-Soluble (peel-off) | Peel up carefully from the edge | Usually fully removable |
Replacing the old design? Get a clean, stitch-ready digitized file for any machine — delivered in 12 hours. No art skills needed. Just upload your logo.
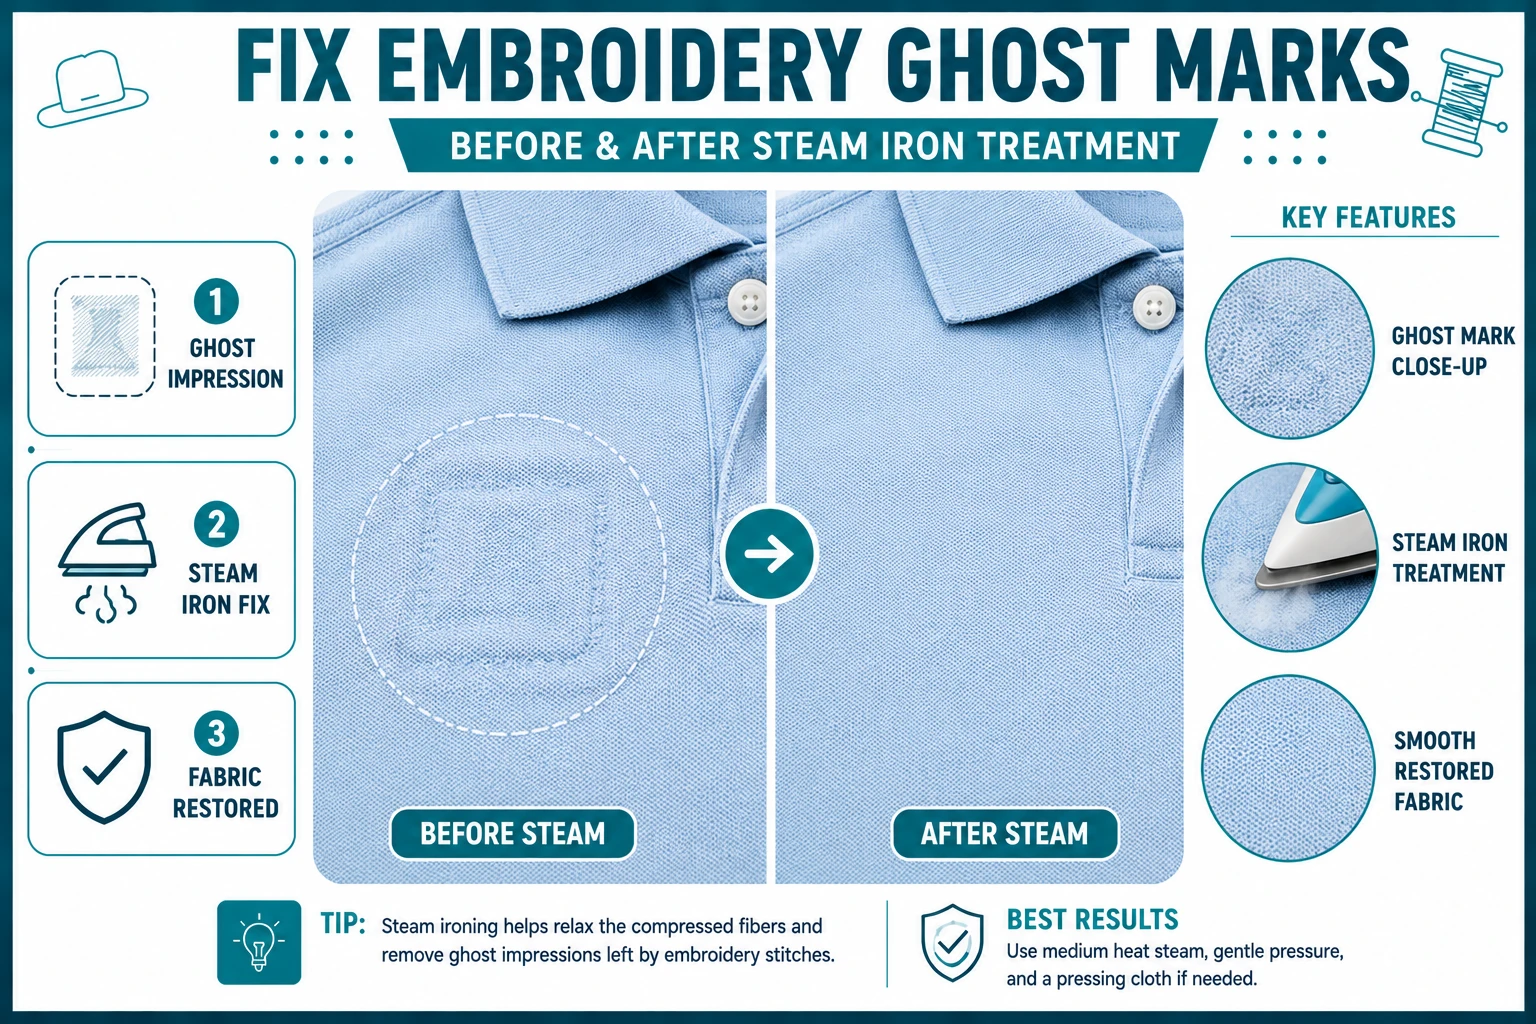
Start My Order →Once the stitching is out, the fabric will often show some texture or compression where the stitches were. This is sometimes called a "ghost" — a faint impression left where the needle passed through the fabric repeatedly during stitching.
To reduce the ghost impression:
On most fabrics, this reduces the impression significantly. On delicate fabrics or areas that had very dense stitching, some texture may remain even after treatment.
Removing embroidery is one of those skills that sounds intimidating until you've done it once. A sharp seam ripper, patience, and working from the inside of the garment are the only things you really need. In most cases, the fabric underneath is salvageable.
If you're replacing the old design with something new, the quality of the digitizing on the replacement file makes a real difference — both in how cleanly it stitches out and in how manageable it would be to remove in the future if needed. A well-digitized file with appropriate stitch density and correct stabilizer recommendations stitches cleaner and causes less fabric stress.
Need help with the digitizing step? True Digitizing has been providing professional professional embroidery digitizing services for over a decade. We convert your artwork into a stitch-ready file for any machine format.
Upload your logo or artwork and get a professional, stitch-ready embroidery file for any machine — delivered in 12 hours.
Get a Free Digitizing Quote →Trusted by 5,000+ customers across the USA · DST, PES, JEF & all formats supported
TrueDigitizing's team of embroidery digitizers and file conversion experts — delivering practical guides for home hobbyists and commercial shops alike. Our specialists cover the full range of embroidery production: custom digitizing for machine embroidery, vector art conversion, and physical embroidered patch manufacturing — with a 6-hour turnaround on digital files and worldwide patch delivery in 5 business days. Every article we publish comes from the same people handling real production orders daily. When we write about stitch density, underlay settings, or file formats, it is because we work with these variables across hundreds of client files every week — not because we researched them from the outside.
Categories

Embroidery Trends 2026: What's Hot in Machine & Hand Embroidery | TrueDigitizing
26-06-2026

Top Best Embroidery Digitizing Software in 2026
06-05-2026
")
Best Multi-Needle Embroidery Machines for Startups 2026
28-02-2026

DST File: The Complete Guide (What It Is, How to Create, Convert & Use in 2026)
28-02-2026

Janome 550E vs Baby Lock Flare | Best Mid-Range Embroidery Machine?
26-02-2026

Choose the Right Fabric for Embroidery
20-02-2026

Advanced Techniques in Embroidery Digitizing
19-02-2026

Most Common Types of Threads to Use in Machine Embroidery
12-02-2026

AI in Embroidery | Revolutionizing Art and Efficiency
12-02-2026

Best Thread Tension 101 | A Guide for Embroidery Machines
09-02-2026
Asked Questions


